Raspberry Pi 24-bit RGB Video on the Cheap - Part One
Published: July 21, 2020
Recently I've become rather nostalgic for the 16-bit era. Some of my fondest memories were playing beat ‘em up games on the Sega Genesis. There’s so many great ways to play your childhood games these days whether it’s via original hardware, FPGA hardware, or software emulation. I’m currently working on modding a non-consumer CRT to accept RGB input (blog post to come), so I wanted a RGB compatible solution. As I’m primarily focused on playing the Sega Genesis, it will be the main topic of discussion.
Ways to Play
Original Hardware
Original hardware sounds like the obvious choice as it natively supports RGB output, however it’s not without its flaws. Some hardware revisions of the sega genesis have inferior sound. The community has since created the triple bypass mod to address the hardware shortcomings.
A used Genesis can be found on the cheap, however once you factor in the cost of the triple by pass mod (assuming you install it yourself), high quality video cables, and your favorite game the cost skyrockets.
Emulation
Emulation has by far the lowest barrier of entry. All you really need is a PC and a gamepad. You’re sacrificing a cycle-accurate experience in favor of convenience. The Genesis' sound has a reputation for being difficult to replicate correctly. The quality of emulation obviously varies across emulators. Projects like MDFourier aim to quantify these audio discrepancies, however I don’t have any firsthand experience with the project.
FPGA Hardware
FPGA based solutions are a fantastic alternative to original hardware. When allotted enough time, developers can create a cycle-accurate experience. It take an excruciatingly long time to reverse engineer SoCs, but the results speak for themselves. FPGAs are a viable solution for 8/16-bit consoles, but they fall flat for newer consoles with complex architectures. FPGAs with sufficent CLBs (configurable logic blocks) capable of replicating a 32-bit or 64-bit SoC exist, however their priced considerably outside the consumer market. As technology progresses prices will inevitably fall. Long term I think FPGA based solutions will be crucial for video game preservation as original hardware begins to fail.
For less complicated systems from the 8/16-bit era it's pretty flushed out from my understanding. Off the top of my head there are two FPGA based solutions that offer genesis/megadrive compatibility:
The Mega Sg from Analogue
The Mega Sg is marketed as a premium plug ‘n play console. Since it only outputs video via HDMI I won’t explore this option any further. Yes, there exist devices to downscale inputs to 240p, however they add lag and therefore aren't practical.
MiSTer
The MiSTer is an all in one solution that allows you to play multiple classic consoles. It's no where near as polished as any of Analogue's offerings, however this is excusable since it’s under heavy development. In its current state it’s geared towards developers, as it requires tinkering. It natively supports analog and digital outputs. I don't follow the project closely, so checkout their Github for the most up-to-date info.
My Decision
After much deliberation I opted for emulation. FPGA based solutions are too pricey for my blood, and I don't have the patience for original hardware. I have no less than 10 Raspberry Pis floating around my office, given my last job entailed developing a custom linux distribution for the SBC (single board computer). I already had a gamepad so all I needed was a way to output RGB from the Pi.
I quickly found the following offerings:
vga666
Pros:
- Opensource
- Price
Cons:
- 16-bit video
- R-2R DAC. Color quality greatly depends on the tolerance of resistors.
vga666rgbs
This peeked my interest in the beginning, however the more I read about the less impressed I was. A fork of vga666, the vga666rgbs is a heavily flawed product. It's in violation of the GPLv3 license stipulated in vga666. Most will probably dismiss my concerns, but as an open source developer this really gets under my skin.
One of the features that it touts is a sync combiner circuit for RGBs output. This addition baffles me since the Raspberry Pi natively supports csync. See DPI_OUTPUT_ENABLE_MODE_COMBINED_SYNCS in the Parallel Display Interface docs. If I'm way off base I would love for someone to tell me. Is there a reason for it's addition?
Pros:
- RGBs via RCA connectors (I don't have to build/purchase any more connectors)
Cons:
- GPL Violation
- 16-bit video
- Price
- R-2R DAC. Color quality greatly depends on the tolerance of resistors.
RetroTINK Ultimate
Pros:
- 24-bit video
- Gerbers available as of Mar 10th 2020. Mike says "open source", but that would entail the actual pcb schematics and board layout. Not complaining just clarifying.
- Superior DAC. I don't have one in front of me, but I presume it's a low-latency 8-bit 3 channel DAC.
- Robust Video Output. Composite, s-video, RGBHV (VGA), RGBs, YPbPr (Component)
Cons:
- Price
- RGBs via VGA (I'd need to build/purchase a connector to accept RGBs via RCA)
Going Down the Rabbit Hole
After weighing all my options, I decided to design my own hat, based off Gert's work on the vga666.
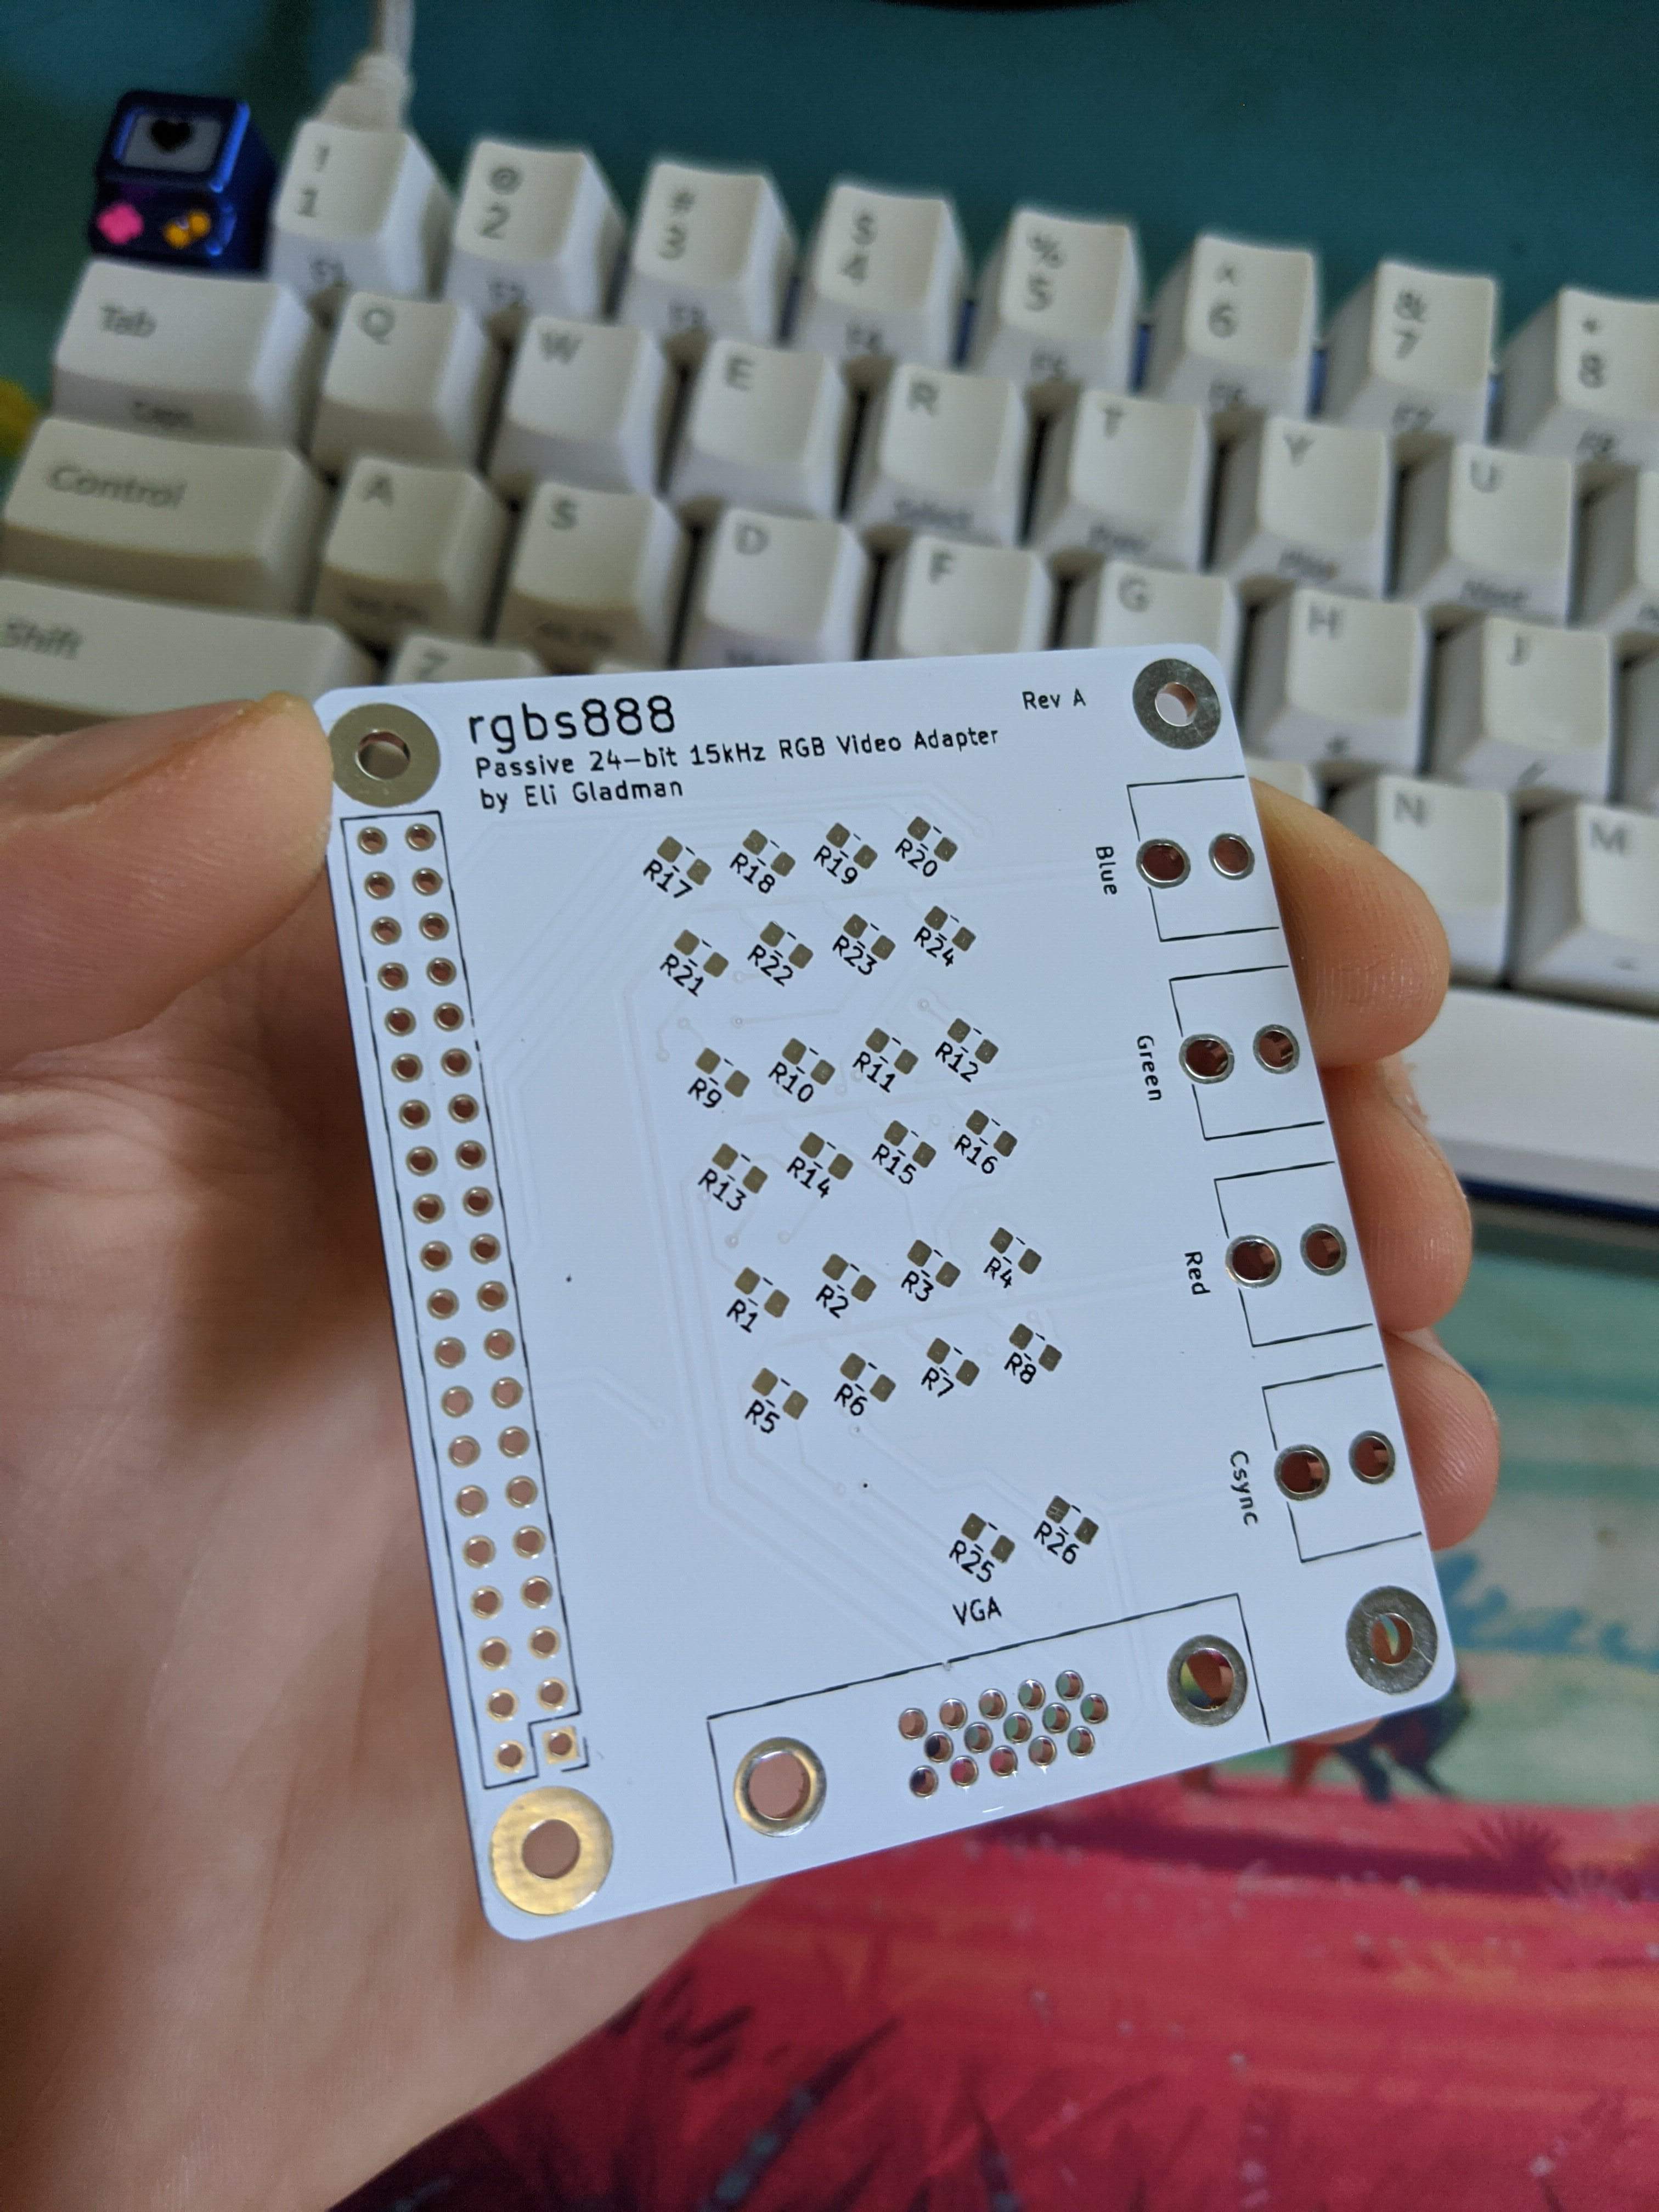
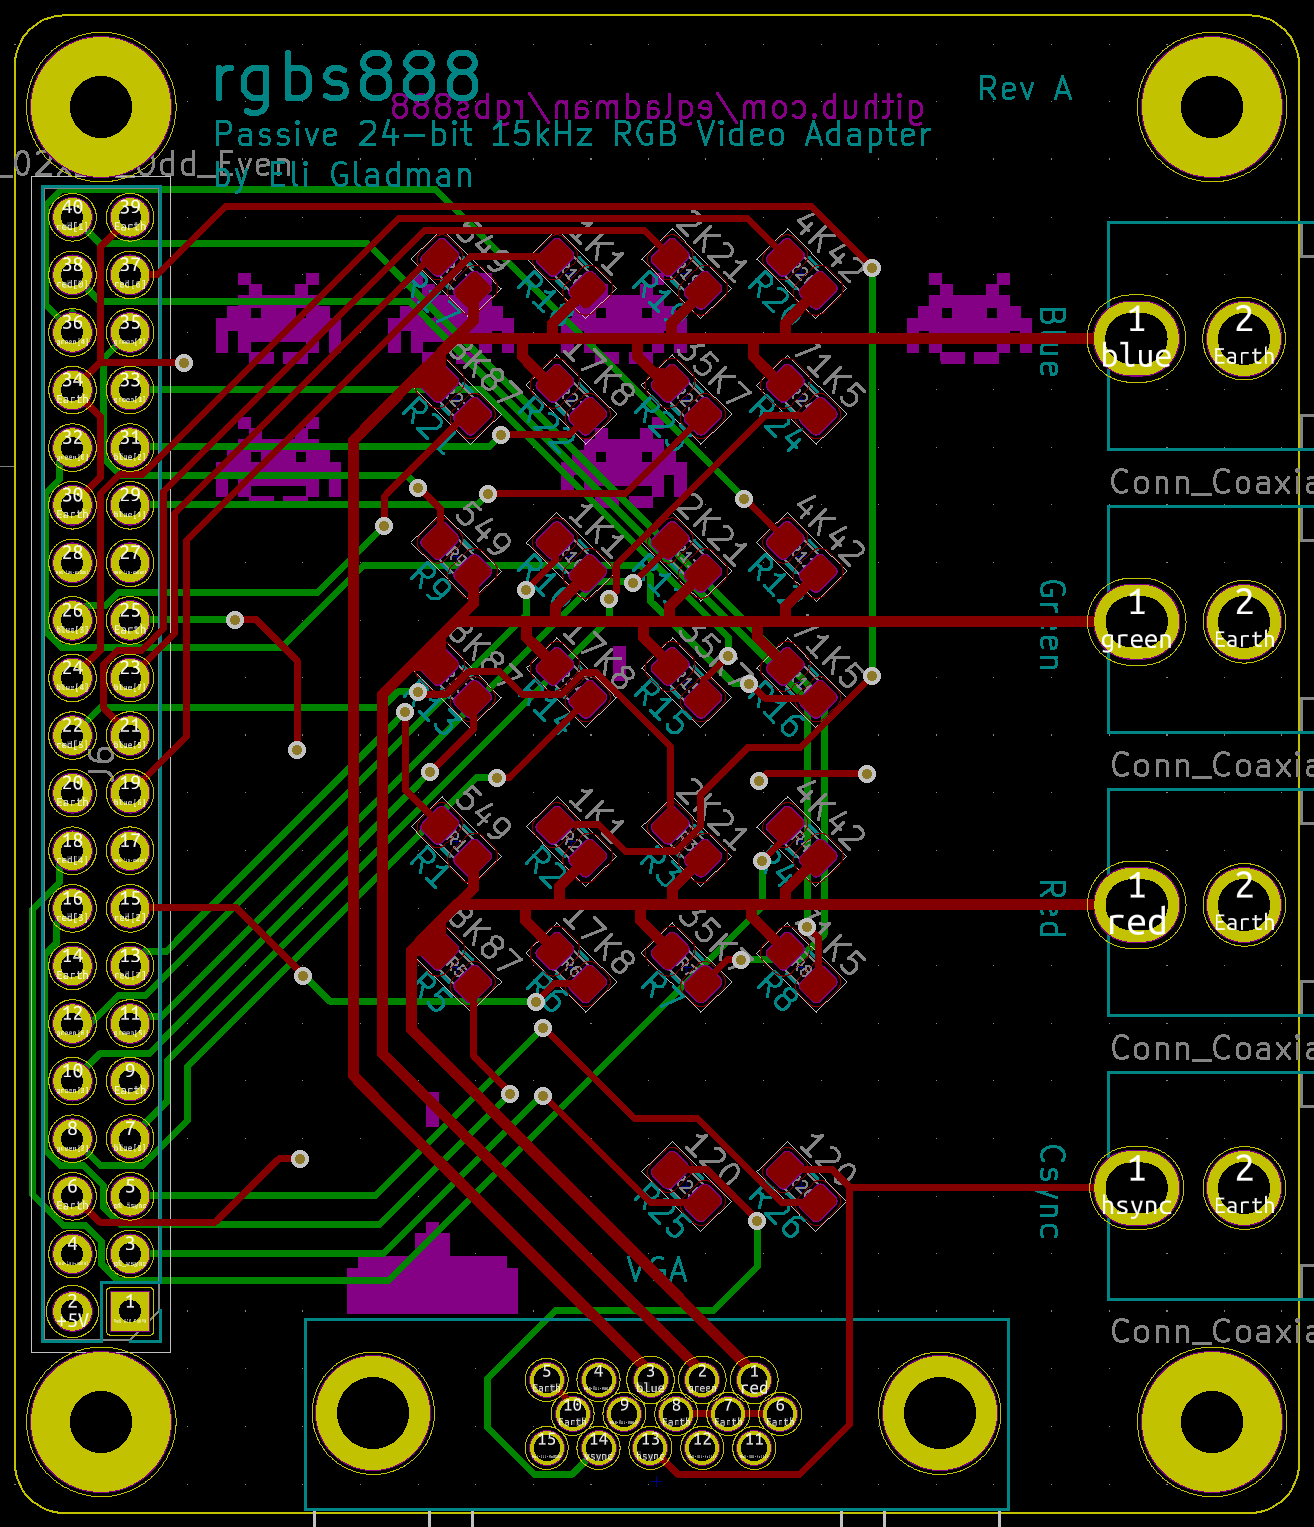
Introducing the rgbs888
If I was going to go through the effort of hooking up a Pi via RGB taking advantage of the DPI's (Parallel Display Interface) entire 24-bit color depth was a no brainer. Hence I created the rgbs888, a fork of vga666 that adds 24-bit support and RGBs via RCA. The R-2R DAC is dirt cheap, while it's inherently not as precious as the RetroTINK, it's a great option for people on a budget like myself. Given it's limited features I don't view it as a replacement/competitor.
To be quite frank, Gert laid all the groundwork, all I had to do was recalculate some values and layout the board.
Here's How I Did It
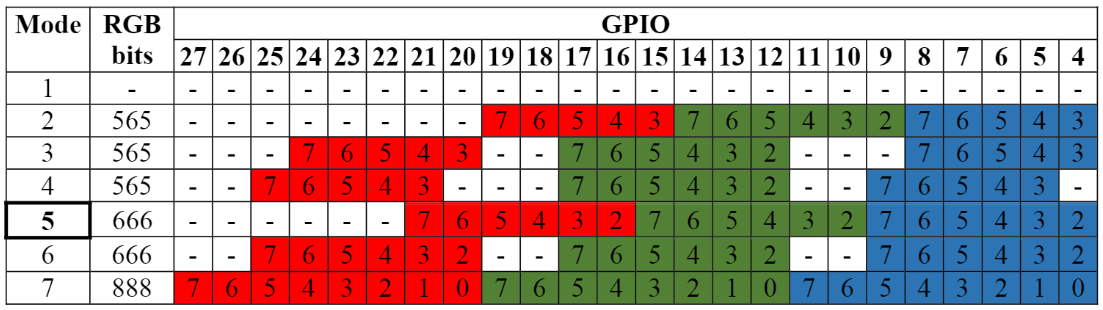
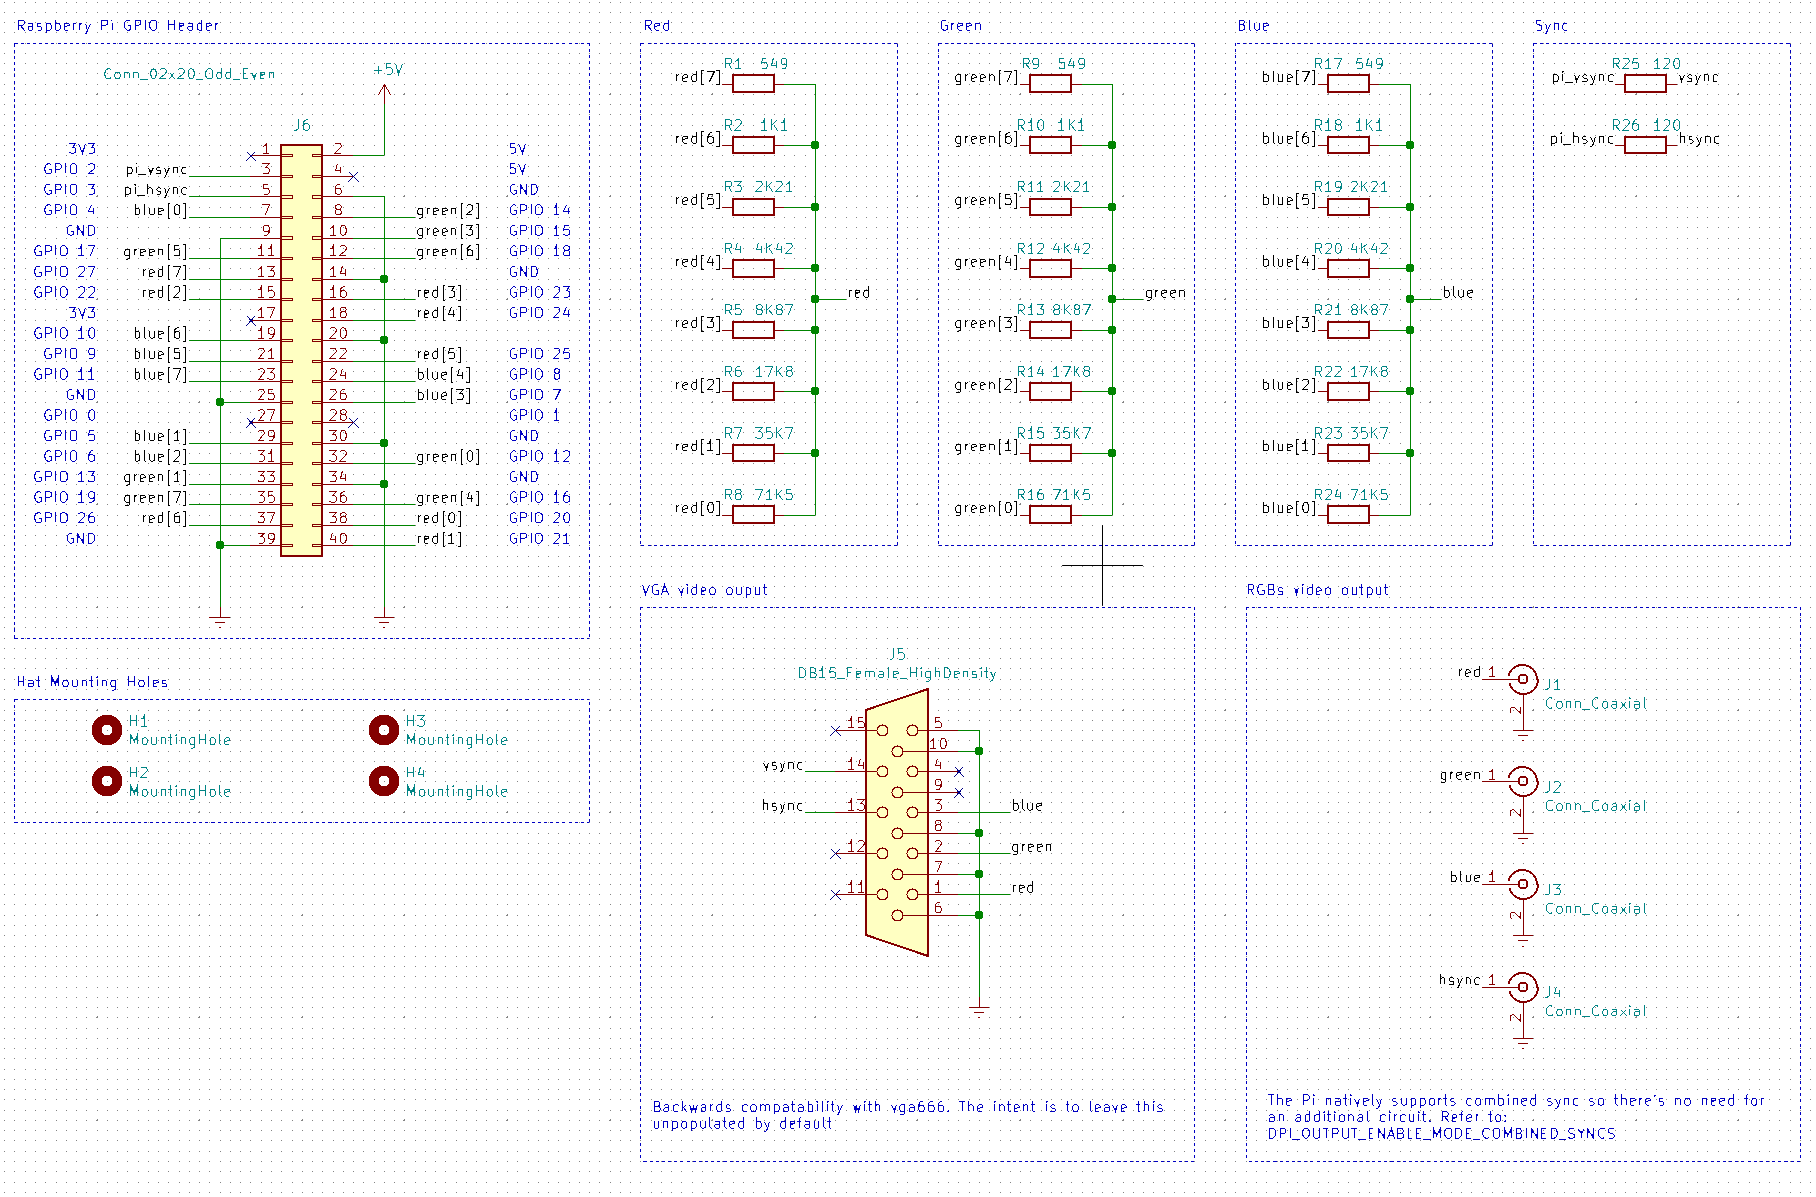
Each color (red, green, and blue) is represented in 6-bits hence the '666' in the name. For 24-bit color depth we must connect the remaining 6 gpio pins documented below, two for each color.
We must then recalculate the value of each resistor using some math. Find x where r=278
1/r = 1/x + 1/2x + 1/4x + 1/8x + 1/16x + 1/32x + 1/64x + 1/128x
When simplified it becomes
x/35445 = 1/64
Cross multiply and divide
x=35445/64
x equals 553.83ohms
There is no off-the-shelf resistor with that value. however 549ohms is readily available. A 549ohms resistor with a 1% tolerance gets us pretty darn close. Worse case scenario we're out of spec by about 2% or 11ohms. I find that pretty acceptable considering the entire resistor ladder is less than $3USD.
When all is said and done we get the following:
549 ohms
1.1K ohms
2.21K ohms
4.42K ohms
8.87K ohms
17.8K ohms
35.7K ohms
71.5K ohms
For an overiew on how resistor ladders work checkout this tutorial by tektronix. I found it helpful.
The source code for the rgbs888 can be found here. Once I have the board populated, and running on the Pi I'll make a follow up post. I had a lot fun with the project and I'm eager to do bigger and better things. This was one of my first times working with analog signals.
Tags: hardware raspberry-pi pcb